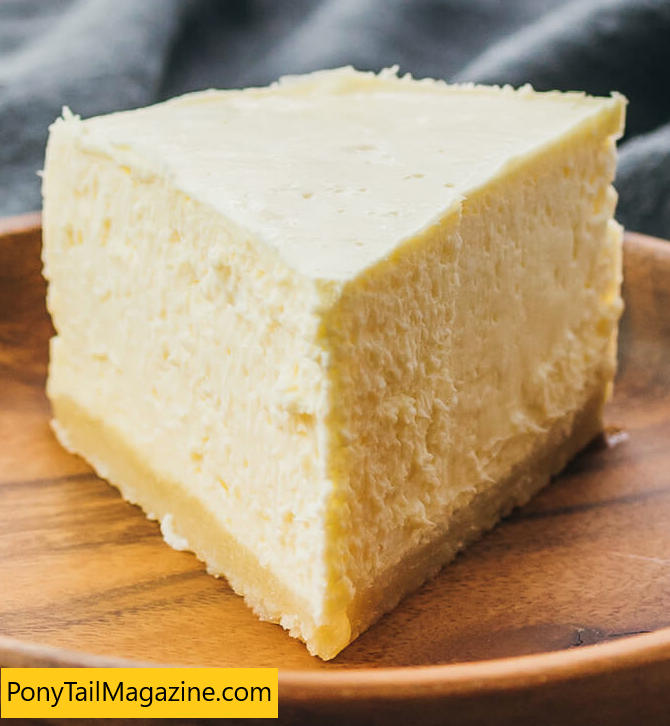
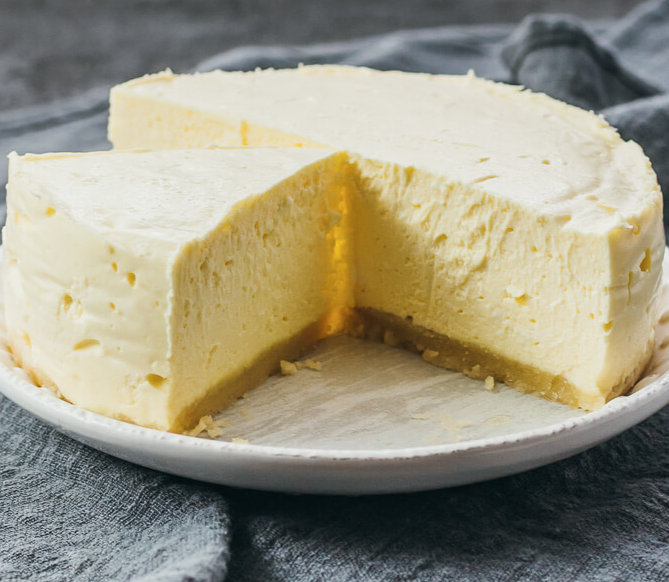
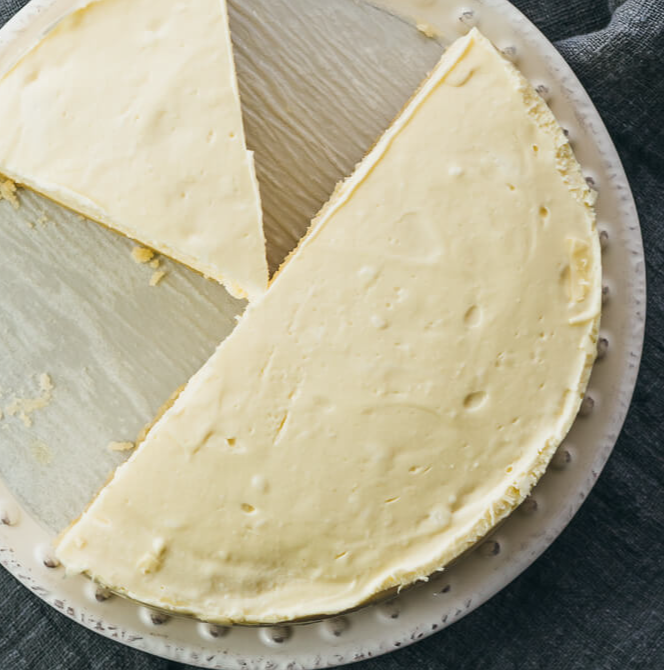
This New York style cheesecake with almond flour crust is rich, creamy, and smooth. Cheesecake is one of few desserts that translates well to a low carb version, without any difference in taste or texture. Using a pressure cooker guarantees consistently good results every time.
| Prep Time | 30minutes mins |
| Cook Time | 30minutes mins |
| Pressure Release | 15minutes mins |
| Yield | 6 servings |
Ingredients
Crust:
- 3/4 cup almond flour
- 3 tablespoons salted butter, melted
- 1 heaping tablespoon powdered erythritol sweetener
Filling:
- 2 (8-ounce) bricks cream cheese
- 2/3 cup powdered erythritol sweetener
- 2 large eggs
- 1/4 cup heavy whipping cream
- 1 tablespoon fresh lemon juice
- 1 teaspoon vanilla extract

Instructions
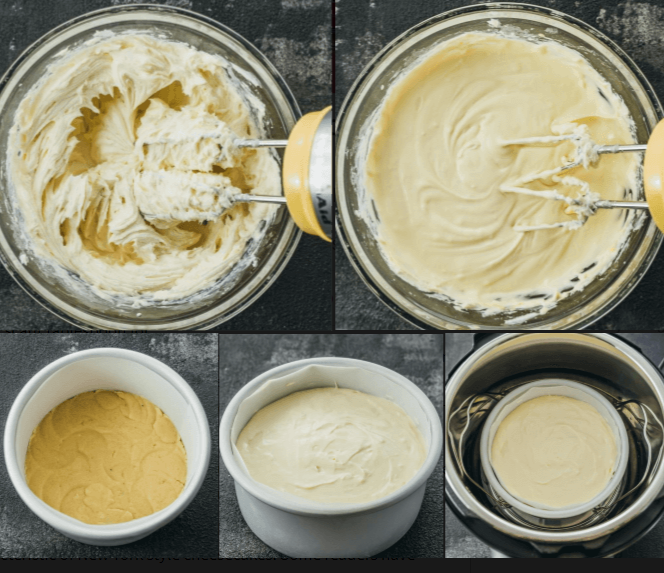
1-Prepare: Set cream cheese, eggs, and heavy whipping cream on countertop to warm to room temperature, at least 30 minutes before proceeding with recipe. Use separate pieces of parchment paper to line bottom and sides of aluminum 6-inch round cheesecake pan with removable bottom. Place trivet inside pressure cooker, with handles resting on sides of pot.
2-Make Crust: Stir melted butter and sweetener in mixing bowl until combined, then stir in almond flour until butter is absorbed and forms dough. Transfer dough to prepared cheesecake pan, and use spoon or measuring cup to firmly press down and form flat, smooth crust covering entire bottom of pan. Transfer pan to freezer to chill crust for 20 minutes while making filling.
3-Make Filling: Beat cream cheese and sweetener in large bowl with electric hand mixer on low speed until well-mixed, about 1 minute. Add heavy cream, lemon juice, and vanilla extract; beat on low speed until smooth, about 30 seconds. Add eggs one at a time, beating on low speed until just combined, about 30 seconds each. Remove pan with chilled crust from freezer. Pour batter over crust, careful not to leave trapped air gaps. Flatten surface with spatula.
4-Pressure Cook: Pour 1 cup of water into pressure cooker pot, and lower cheesecake pan onto trivet. Secure and seal lid. Cook for 30 minutes at high pressure, followed by 15-minute natural release. Manually release any remaining pressure by gradually turning release knob to venting position. Carefully lift lid to avoid dripping condensation on cheesecake. Top of cheesecake should be jiggly but not liquid. If needed, use paper towel to carefully dab cheesecake to absorb condensation on surface. Turn off pressure cooker.
5-Cool Cheesecake: Let cheesecake cool uncovered in pressure cooker for about 1 hour. Use trivet’s handles to lift cheesecake from pot onto countertop and let stand until fully cooled. Loosely drape dry paper towel over cheesecake pan and refrigerate for at least 24 hours. Carefully remove chilled cheesecake from pan, and peel off parchment paper. Slice and serve.
NOTES & TIPS
(1) Almond Flour. About 3 ounces weight. I use almond flour that is blanched, which means the skins are taken off of the almonds, so the resulting flour looks white. I typically use Costco’s Kirkland brand, which has 2 grams of net carbs per 1/4 cup serving. Readers have had success substituting some or all of it with ground pecans. Don’t substitute with coconut flour, which is more absorbent.
(2) Sweetener. Crust: 1 heaping tablespoon = 0.5 ounce weight. Filling: 2/3 cup = 4 ounces weight. Erythritol is a dry sweetener, about 70% as sweet as sugar. I buy granulated erythritol online and powder it using a small blender like the Nutribullet. If you’re substituting with Confectioners Swerve, use 1 scant tablespoon for the crust and 1/2 cup (= 2.8 ounces weight) for the filling. You can substitute with another dry sweetener; to determine how much to use, check your sweetener’s packaging to see how it compares to regular sugar. I don’t recommend liquid sweeteners which affect the ratio of dry to wet ingredients.
(3) Cream Cheese. Two standard bricks = 16 ounces total. I use regular, full-fat cream cheese from the brand Philadelphia, not reduced fat or light versions.
(4) Heavy Whipping Cream. This ingredient gives cheesecakes a silky, firm, and dense texture, which is a key characteristic of New York style cheesecakes. Some readers have reported success with substituting with half-and-half.
(5) Room Temperature Ingredients. It’s important to remove cold ingredients — cream cheese, heavy whipping cream, eggs — from the refrigerator at least 30 minutes before starting the recipe. You want to give them time to come to room temperature, helping to ensure a smooth and creamy batter. Otherwise, you might end up with a lumpy batter.
(6) Cheesecake Pan. I use Fat Daddio’s aluminum 6-inch round cheesecake pan with removable bottom that’s six inches in diameter and 3 inches tall. If your pan is 7 inches in diameter, decrease the pressure cooking time by 5 minutes. I like the convenience of the removable bottom, but you can also use a springform pan. The sides and bottom of the pan should be lined with parchment paper (see photos); no greasing needed.
(7) Pressure Cooker Equipment. I use a 6-quart Instant Pot. Other sizes of electric pressure cookers should also work as long the cheesecake pan fits within the maximum capacity. You’ll also need the trivet that came with your Instant Pot or a steam rack with handles; if yours doesn’t have handles, you can make a foil sling to help you transfer the cheesecake out of the pressure cooker when it’s done.
(8) Mixing Batter. Don’t over-mix while beating the batter, or you’ll end up with a lighter and fluffier batter, resulting in an airier and puffier cheesecake. We want a dense, firm, and smooth cheesecake. At every step, the batter should be mixed until the ingredients are incorporated and smooth, and no more. I provide electric mixer time estimates in the recipe to give you an idea, based on a 5-speed KitchenAid electric hand mixer.
(9) Chilling Cheesecake. It’s very important to let the cheesecake chill in the refrigerator for at least 24 hours before serving. This cheesecake is very moist after pressure cooking and needs time to dehydrate in the refrigerator. That’s why it should only be loosely covered with a paper towel, not tightly sealed.
(10) Serving / Storage. This cheesecake is delicious by itself, with a dollop of whipped cream, or served with sliced strawberries or puréed berries. Store leftover slices in an airtight container in the refrigerator for up to 5 days or in the freezer for up to 3 months. Once frozen, thaw in the refrigerator overnight.
(11) Carbs. The nutrition calculation assumes you are using an erythritol-based sweetener that uses sugar alcohols, whose carbs are non-impact and therefore not included in the nutrition estimate. Apps that count sugar alcohols will show a higher number of carbs.
(12) Key Lime Cheesecake. I’ve made versions of this cheesecake with other flavors, and my favorite is key lime where I add 2-3 tablespoons key lime juice and lime zest in place of the lemon juice. If you make this with your own flavor twist, let me know in the comments section below.
(13) Why Instant Pot? The advantage of cooking cheesecake and other traditionally baked desserts in the Instant Pot is that pressure cooker recipes are less susceptible to the vagaries of ovens. Some ovens run too hot, some run too cold, and baking often involves some intuition on the part of the baker. With the Instant Pot, you get more consistent and reproducible results.
NUTRITION
| Makes 6 Servings | Amount Per Serving (1 slice) |
| Calories 460 | (88% from fat) |
| Total Fat 45g | 69% |
| Saturated Fat 23g | 114% |
| Cholesterol 168mg | 56% |
| Sodium 370mg | 15% |
| Net Carb 4.5g | |
| Total Carb 6g | 2% |
| Dietary Fiber 1.5g | 6% |
| Sugars 1g | |
| Protein 11g |
Did you make this? Tell us about it!